HOW TO CARE FOR AND TENSION YOUR MACHINE FOR YOUR SPECIFIC PURPOSE
I found the most informative and helpful points made on adjusting tension through Claire Shaeffer’s article Understand Thread Tension in Threads Magazine issue # 78 and used this piece as reference throughout this page. Also Threads Magazine offered online provides a variety of topics with useful information for all levels of sewing abilities. In addition, All Free Sewing (www.allfreesewing.com) offers a free newsletter called “Sewing It Up” with pattern and projects, tutorials and more.
So regarding tension, the tension on your machine is set for an average mid weight fabric with #14 needle and mid-weight cotton thread. If you are sewing much heavier, or lighter materials tension adjustment will be required for your specific needs.
Many sewers avoid the tension dials on their machines like the plague, certain they’ll only make matters worse if they make adjustments. In fact, there’s nothing very mysterious about setting and adjusting thread tensions on your sewing machine, whatever its make and model. What’s potentially more confusing is that many apparently tension-related problems are caused by factors other than misadjusted tension dials. Let’s look closely at how to identify and correct “tension” problems, both with and without touching the tension settings.
Don't Touch that Dial!
So many things can affect the tension that it’s worthwhile to run through the following checklist in the order given before you reach for the tension regulator• Incorrectly threaded machine
Incorrect threading is responsible for more “tension” problems than any other factor. Did you use all thread guides? Did you thread with the presser foot down, thus keeping the thread from slipping fully between tension discs? Is thread unwinding freely from the spool, or catching on the the spool’s slash? Are you using a bobbin as a spool (which can interfere with the thread flow)? Is the bobbin inserted correctly?• Incorrectly filled bobbin
Remove any thread on the bobbin be-fore you wind on new thread. Wind the bobbin following the machine instructions, so it’s evenly wound at the proper tension. Remove any thread from the outside of the bobbin. Wind at a consistent, slow or medium speed, especially with polyester and nylon threads, to keep them from stretching; they relax in your seam, causing puckers• Dirty machine
Lint and thread ends lodged between the tension discs, under the throat plate, or around the bobbin case and bobbin, increase the resistance and restrict the thread flow. “Floss” between the tension discs with a lightweight, lint-free cloth, and check in the bobbin area for thread ends and lint.• Damaged machine parts
Bent needles and bobbins, and rough or damaged surfaces on the needle eyes, thread guides, tension discs, take-up lever, throat plate, presser foot, bobbin case, and in the bobbin area can all cause problems. If you drop a metal bobbin on a hard floor, throw it away, even if it looks fine; the smallest damage can distort tension. Avoid damage to the bobbin-tension spring by cutting the thread close to the case before removing the bobbin. Raise the presser foot before removing thread from the upper tension.• Needles, threads, and fabrics
Different thread sizes and types on top and in the bobbin can throw off basic tension settings. A needle that’s too large or small for the thread can also unbalance your stitches, because the size of the hole adds to or reduces the total top tension. If you find that you’re getting puckers on organza, chiffon, jersey, lace, or blouse-weight silks or polyesters, try changing to a straight-stitch foot and needle plate, and shorten the stitch length to 1.75 mm, before you reach for those tension dials.Recognizing balanced tensions
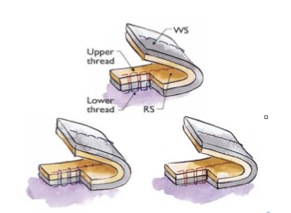 When the tensions are balanced, the stitched line looks good on both sides of the fabric, as shown in the drawing at the top, and the seam is at its strongest and most elastic. The easiest way to spot unbalanced tension is to look for visible knots or loops at the end of each stitch. When the bobbin thread shows on the right side, the needle tension is too tight or the bobbin thread, too loose, as shown in drawing to the left. When the needle thread shows on the wrong side, the needle tension is too loose or the bobbin thread, too tight, as shown in the drawing at right. Of course, if you’re sewing on very thin or lightweight fabrics, both threads may show on both sides when the tension is balanced, simply because the fabric is so thin.
Meet your tension tools
In order to form a row of stitches that looks the same on both sides of the fabric, the same amount of thread needs to flow from the spool and the bobbin simultaneously. This is accomplished by running the threads through various tension devices, including the thread guides, tension discs, and tension regulator on the machine head for the upper thread(s), and the bobbin-case spring for the bobbin thread. Some machines also include a small hole in the bobbin-case finger, through which to feed the bobbin thread to increase the tension for improved stitch definition when topstitching, satin-stitching, and embroidering, without touching your tension settings. The tension discs and tension regulator together are called the tension assembly. The tension discs squeeze the thread as it passes between them, while the tension regulator controls the amount of pressure on the discs. On older machines there are only two tension discs, controlled by a screw or knob. On newer models there are three discs controlled by a dial or key pad on the front of the machine, which can regulate two threads at once.In either case, the tension regulator is elementary: When adjusted to a higher number (turned clockwise), the discs move closer together, increasing the amount of pressure. Turned to a lower number (counterclockwise), the discs move apart, decreasing the pressure. Using a thicker thread without resetting the dial will increase the pressure and cause the upper thread flow to decrease, unless you’ve got a newer machine that makes automatic upper-tension adjustments. Since the bobbin tension is not self-adjusting, the lower tension may need to be adjusted manually to match.
In addition to guiding the thread along its path, each thread guide exerts a small amount of resistance on the thread, adding to the tension from the discs to achieve balanced tension. Bottom line: Always make sure all guides are threaded before stitching. It is helpful to realize that the top thread, powered by the sewing machine motor by way of the needle and needle bar mechanism, is active and powerful, and does ALL the work. The lower, or bobbin thread, is totally passive. It is just along for the ride, pulled upward by the force of the needle thread. The flat bobbin-case spring exerts pressure on the thread as it comes out of the bobbin case. The amount of pressure is regulated by a small screw at the rear of the spring. Both the spring and screw are easy to locate when the machine has a separate bobbin case. When the machine has a drop-in bobbin with a built-in bobbin case, locating the tension screw can be more challenging. In either case, to increase the resistance, use a small screwdriver to turn the screw clockwise (to a higher number) or counterclockwise (to a lower number). Turn the screw in small increments and never more than a quarter-turn between tests. This helps you keep track of how much you’re changing your settings and reduces the risk of losing this very small screw.
As with the tension dials, the amount of pressure will be increased when thicker threads are run under the bobbin spring. To eliminate the need to fiddle with the bobbin-case screw, many sewers have two bobbin cases: one set for general sewing and the other for adjusting to less frequently used threads. Each time you install a new bobbin, you must check its tension. Also, you may need to make some adjustments for different types of garments being sewn. In addition, the last 10% of a bobbin thread tends to have a rapidly changing degree of tension, so it’s acceptable to discard the bobbin before it completely runs out, in order to avoid this problem. If you have a removable bobbin case, you can use what is called the drop test to set case tension.
Bobbin Drop Test
Though an optional bobbin tension gauge can be purchased for your machine, the tension can be accurately set using what’s known as the “drop test.” Perform the following steps:
- Remove the bobbin case from the rotary hook.
- Unwind the bobbin thread from the pigtail (the arm sticking out of bobbin case) but do not remove it from under the thread tension spring.
- Place the bobbin case, with the bobbin installed, in the palm of one hand. With the other hand grasp the end of the bobbin thread, and gently pull out about 12 inches of thread.
- Gently left up and suspend the bobbin case above the palm of your hand. The bobbin should not drop, but remain suspended in the air about an inch above your hand.
- Gently bob your wrist (hand holding the bobbin thread) and check that the bobbin drops a few inches then stops.
- If the bobbin does not drop, then the tension is too tight. Adjust the tension screw(the larger one) on the tension spring (clip) counterclockwise to reduce the bobbin tension.
- If the bobbin drops freely, then the tension is too loose. Adjust the tension screw clockwise to increase it to increase the bobbin tension.
SIDE NOTE
IF dirt builds up under the Thread Tension Clip/Spring on the bobbin case, it will cause the tension to be too loose, no matter how much the screw is tightened. Each time you change out the bobbin, you should inspect and clean the bobbin case
Because different weights of fabric require differing amounts of power to move the needle and thread through the fabric the general rule is for light fabric, set the upper thread tension lower and the lower thread tension higher while heavier materials require the upper thread tension set high and a decrease in the tension on the lower (bobbin) thread.
Tensions can still need adjustment even if they’re balanced. If both tensions are too tight, the seam may pucker, or break easily when stretched. If both are too loose, the seam will gap when pressed open, exposing the threads between the sections.
Do a basic stitch adjustment test. Set the stitch length for 2 mm (12 stitches/in.) or for the length you expect to use most frequently. Set the upper-tension regulator at the middle of its range (usually 4 or 5) and stitch a test seam on two layers of lightweight fabric then examine the stitches. If the tension isn’t perfect, fix it by adjusting the bobbin spring: tighter if the bobbin thread shows on the upper layer and looser if the needle thread shows on the under layer. Make another test seam and examine the stitches, repeating until the stitches are balanced.
Typically, when you use a lighter-than-normal thread for both needle and bobbin, the tensions will stay balanced, even though they’re both lighter. This is often just what you need to avoid puckering lightweight fabrics, so no adjustment may be necessary. A heavier thread in top and bottom will increase both tensions and you’ll probably need to set a lighter tension to accommodate heavier fabrics. Usually want to test your stitch tension on some scrap material will be using when starting a new project to ensure that the fabric weight, choice of needle and thread weight is correct.